Friday, 9 November 2012

Week 14

INDUSTRIAL DAY!!!!!!!!


Industrial Day held on Thursday 8 November 2012....
That day is my DEMO PRESENTATION  and INTERSECTION ROBOTIC CHALLENGE...


During the demo presentation


COMPETITION VIDEO


I got the Second Prize Winner in the "Intersection Robotic Challenge"
HOOREYYY!!!!

Friday, 2 November 2012

Week 11, Week 12 and Week 13

Before this, I just test the servo motor of the robot to check the condition of the motor and also to see the robot can walk or not.

My next step is create the full program include the coding for Infra red distances sensor.

To see my testing robot, 

LET'S WATCH THE VIDEO BELOW!!!!!


After try the program on the ARDUINO UNO board, I try use the ARDUINO circuit that I have etching before this to see the result it same or not with use the ARDUINO UNO.


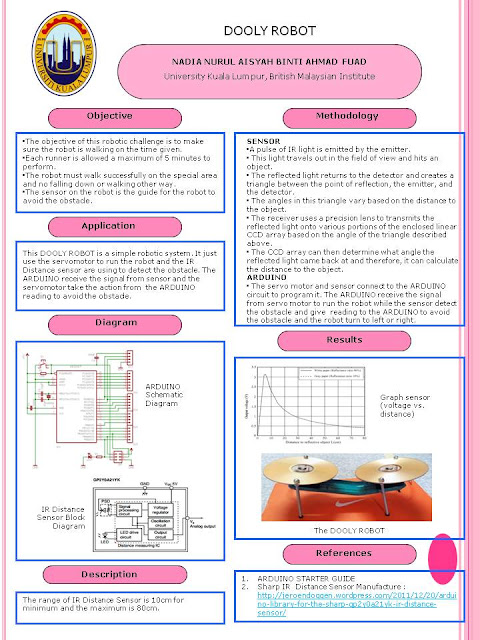
Before the presentation day, I need to print out my poster to show my project result.

This is the poster that I have print!!!!!


Friday, 12 October 2012

Week 10

This week have the final briefing to the Final Year Project student on the Thursday!!!

Beside that, I still continue complete my robot....

After done the soldering, I try the robot using the ARDUINO uno to see my robot can walk or not...

I use the example coding that i have found on my research..


#include <Servo.h>
Servo frontservo,backservo;
char forward[] = {60,100,100,100,100,60,60,60};
void setup()
{
  frontservo.attach(9);
  backservo.attach(10);
}
void loop()
{
  for(int n=0;n<4;n++)
{
  
      frontservo.write(forward[2*n]);
      backservo.write(forward[(2*n)+1]);

      delay(300);
  }
}


This is the video that I have done using the ARDUINO uno

Friday, 5 October 2012

Week 9

Continue done the PCB board!!!!!!!

Step 6:
- Drill the holes on the circuit
- Troubleshoot the circuit by using the multimeter


Step 7:
- Solder the component on the PCB board


The circuit after solder

Friday, 28 September 2012

Week 8

After complete the mechanical part last week.....
Now it is the time to continue the software part for my robot..... 
Software is like the engine inside the car.....
If the car have not engine, how the car can move????
It same goes to my robot...
It need the circuit to give the instruction to the mechanical part working....
I use the ARDUINO software for my robot!!!!!!

This is the steps for the software part:

Step 1:
- Design the ARDUINO circuit by using the DIPTRACE software.
- Convert the ARDUINO circuit to the PCB circuit.
- Design this circuit in the schematic circuit after that convert to the PCB


Step 2:
- Print the circuit on the OHP paper by using laser printer.
- Stick the OHP paper on the PCB board. Make sure all the paper surface close to the board.
- Iron the circuit on the PCB board until all the black line of the circuit stick on the board.


Step 3:
- After iron the circuit about half and hour, let the circuit cold for a few minutes.
- Pull out the OHP paper on the board, carefully during pull out the paper and make sure the black line stick on  the board.


Step 4:
- Etching the circuit in the acid


- The PCB board after the etching


Step 5:
- Scrub the black line on the PCB board until got the gold line.


Friday, 14 September 2012

Week 6 and Week 7

WEEK 6

After done all the task week 4 and week 5, the robot has the problem..... 

This picture show the robot's leg is not stable...

This robot it can't to move properly because their legs like that...


How I solve the this problem is design back the robot and change a few material to get the stable robot to walk. 


Step 1: Telephone holder
- Change the telephone holder to this shape


Step 2: Servo motor
Zip tie them both in place using the hole that I have drilled in step 2


Step 3: CDs
-Zip tie the CD to the motor in such way that the motor is at the center of its rotation point and the two outer holes are perpendicular to the telephone.


Step 4: Bolts
- Tie the CD and servo motor with bolts at the center.


Step 5: Robot
- This the result after make a changers on the previous model of the robot.
- The robot is more stable and can walk like usually


WEEK 7

This week, I have complete all the mechanical part on my robot...

For the next step is continue with the software part and the circuit for my robot..

Friday, 31 August 2012

Week 4 and Week 5

Next step to do after buy the material is a plug in the materials to become the real robot.


Step 1:
- Remove the cover from the telephone holder and pull out the speaker, microphone and jack.


Step 2: Drill
- Drill 4 holes each end of the telephone holder as picture below


Step 3: The first motor
- Put the first servo motor on the telephone holder


Step 4: The second motor
-  Put the second servo motor on the telephone holder
-  Zip tie them both in place using the hole that I have drilled in step 2


Step 5: Drill the CDs
- Make the hole at the right side and left side on the CDs


Step 6: Bolt
- Pass the bolt through the notched CD, towards the body of the phone. Pass the other bolts through the other CD
- Fasten all of them in place with nuts.
- Cover all of the bolts with rubber bolt covers to give them a bit more traction 


Step 7: Attach CDs
- After done the step 6, zip tie the CD to the motor in such way that the motor is at the center of its rotation point and the two outer holes are perpendicular to the telephone.


Friday, 17 August 2012

Week 3

This is all the materials that I have buy for the mechanical part


Materials needed:

1. Telephone holder (x1)
2. CDs (x2)
3. Servo motor 180° degree movement (x2)
4. Battery 9V (x1)
5. Battery holder (x1)
6. 4" Bolts and nuts (x4)
7. Infra red distance sensor (x1)
8. Couple dozen assorted zip ties
9. Bolt cover (x4)

Friday, 10 August 2012

Week 2

After my robot got approve from my supervisor, I start list down the things and component to buy.


I try to build the robot same like this picture. But I'm not sure if I can do it this robot for my Final Project and also my robot for the Intersection Robotic Challenge. 

Friday, 3 August 2012

FYP 2: Week 1

On the first week after semester break, I see the supervisor to show him a few examples of robot design that I have found. 

According to the previous semester for the robot types, I prefer the 4 legs robot for my competition. I choose 4 legs robot because this robot more stable compare to the biped robot and for the hexapod robot, it is more expensive and difficult to build up. After the discussion with my supervisor, he agree with my suggestion robot.


Now, this is the beginning for me to start and finish up overall of my Final Year Project!!!!!!!

Friday, 4 May 2012

Week 12, 13, 14 and 15

Week 12


This is the presentation week for all FYP1 students taken. The presentation day be held on the Thursday evening. 2 assessor will be assess me on that day. Them will give me the suggestion or opinion to improve my project.


Week 13 and Week 14


After done the proposal presentation, now this is the time to complete all the progress report and double check the report before submit to the supervisor.


Week 15


Done all task for Final Year Project Semester 1. Progress report are submit on this week. 

Friday, 6 April 2012

Week 10 and Week 11

In this 2 week, I need complete 3 tasks:

1. Finalize data.
-This task I should check back what I have done before. I also need collect all the data that I have.

2.  Analyse data
- Analyse all the data have been collect from week 1 until week 9

3. Write report
- After complete all task from the week 1 until 9, it is the time to write down all the data I have collect for the proposal report and also need to prepare  the slide show for the presentation.

All this task I need to complete before the presentation day on the week 12.

Friday, 23 March 2012

Week 9

The task for me in this week, I need to design the flow chart and program structure.

To design the flow chart, I use the Microsoft Office Visio. This software is more easier compare use the Microsoft Office Word.


Friday, 16 March 2012

Week 8

After attend the ARDUINO Class in the week 7, I start to study the software and try to create the coding for my robot.

Besides that, I still searching the other example coding for my robot in the internet and books.

Friday, 2 March 2012

Week 7

I'm the ARDUINO software user beginner. To learn more about the ARDUINO software, I join the ARDUINO class had in the BMI. The class given by Sir Zulkifli Bin Mahmoodin.

During this class, i learn how to use this software. I also try to make blink circuit to try my knowledge about this software. The duration this class about 8 hour from the 9am until 5pm for one day only. 


Student pass for ARDUINO Class

Friday, 24 February 2012

Week 6

To design the robot, the important things that we need to do is a find the best materials to get the amazing robot.  

what the materials and tools to build up this 4 legs robot.

The first things is their body. The next is a leg, without the leg this robot can't move. The last important part in the robot is a electronics component. This is a part to make move the robot.


Robot Leg - CD,Bolts and Nuts, and Servo Motor 


Robot Body - Telephone Holder


Robot Sensor - Infra Red Distance Sensor


Electronics Component - ARDUINO


Friday, 17 February 2012

Week 4 and Week 5

After make a survey and research for the robot. Now it's a time to draw the project design.

Through the research robot, i got the idea how to design the robot. Depends on the rules of Intersection Robotic Challenge given as below: 

1. The robot must without wheel

2. No rolling object 

3. Motor watt are 210° movements are allowed

4. The robot must move 7 foots in 3 minutes and the main      objective is the robot need to avoid the obstacle

5. The size of robot is 25cm x 25cm and no height limit

6. Hemisphere wheel are allowed


Based on the rules given, I try to design the 4 legs robot.
My robot not exactly like this, but I try design same like this with 4 legs.


Example of 4 legs Robot

Friday, 3 February 2012

Week 3

For this week, i need to do the research of my project. Define literature review on my robot.

There are many types of robot are existing before this. for example

1. Biped Robot
2. Hexapod Robot
3. Worm Robot
4. Quadrotor Robot
5. 2, 4 or 6 legs Robot

4 Legs Robot

Worm Robot

THIS FIGURE SHOW THE EXAMPLE OF ROBOT ALREADY EXIST


Friday, 27 January 2012

FYP 1: Week 1 and Week 2

Now i'm as semester 6 student. In this semester every students need taken the Final Year Project for 1 year.

 After a year, each student's need to present their project.

For the first week, student need to do the research and decide the Final Year Project Title. it same goes to me.

Other student design their project depends on their course, but me i got chance to participate the "INTERSECTION ROBOTIC  CHALLENGE".


I need the supervisor to be my project adviser. I choose the Medical Section lecturer; Sir Zulkifli Bin Mahmoodin (ZUM) as my supervisor.


 After  make the discussion with him, he agree to be my supervisor and i continue show up my project title.